Wickham's HTML & CSS tutorial
Sitemap | Home | Search | Forms
Form to send an HTML email from a web form
View in Firefox, Safari, Opera and IE but IE6 often needs different solutions. In general IE7 and IE8 display like Firefox apart from the HTML5 and CSS3 features. The IE9 & above updates are mainly related to HTML 5 and CSS3 issues and display to a large extent like other main browsers. Google Chrome is based on the same WebKit engine as Safari.
Some of the examples are provided just to show problems, others show solutions that work in most major browsers. Use the example that suits you.
 problems
  warning: works in some situations or some browsers or needs care to display as you wish
  OK in Firefox, Safari, Opera, Google Chrome and IE
HTML Email sent from a web form without using a viewer's email client
See Forms and Forms to send email without using an email client for general information.
1 This uses a simple form to send an email with html content to the person submitting the form and an email to you with the person's name and email address for your records.
This example only has a name and email address and would be used in a situation where your webpage offers to send an email with some prepared information like product details. Item 1b on Forms to send email without using an email client is for use where people need to send you a message (and probably want confirmation of it by return email) and that form could also be edited to be an html email.
The code for the form on this page is:-
- <form action="process-html.php" method="post">
- <ul style="list-style-type: none;">
- <li>Name: <input type="text" name="name" size="30" maxlength="40"></li>
- <li> </li>
- <li>Email: <input type="text" name="email" size="30" maxlength="40"></li>
- <li> </li>
- <li><input type="submit" name="submit" value="Send"></li>
- </ul>
- </form>
The code for the process-html.php page is as follows:-
- <?php
- @extract($_POST);
- $admin = 'mail@your-domain.com' ; // Change to your admin email 'from' address
- $subject = 'Tutorial URLs'; //Your email subject
- $name = stripslashes($name); //can be stripslashes('name');
- $email = stripslashes($email);
- // Your HTML message with table, links and images
- $message = '
- <html>
- <head>
- <title>HTML & CSS Tutorial</title>
- </head>
- <body>
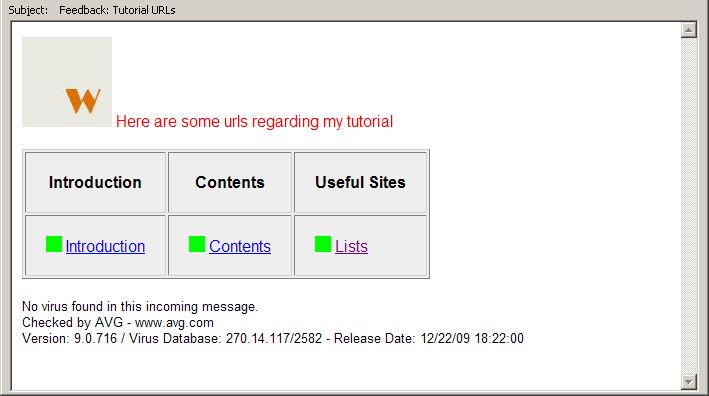
- <p style="color: red;"><img src="http://www.wickham43.net/images/orangew90x90.jpg" width="90" height="90" alt="Orange W"> Here are some urls regarding my tutorial</p>
- <table border="1" cellspacing="2" cellpadding="20" bgcolor="#eeeeee">
- <tbody>
- <tr>
- <th>Introduction</th><th>Contents</th><th>Useful Sites</th>
- </tr>
- <tr>
- <td><img src="http://www.wickham43.net/images/green16x16.jpg" width="16" height="16" alt="Green Square"> <a href="http://www.wickham43.net/">Introduction</a></td>
- <td><img src="http://www.wickham43.net/images/green16x16.jpg" width="16" height="16" alt="Green Square"> <a href="http://www.wickham43.net/contents.php">Contents</a></td>
- <td><img src="http://www.wickham43.net/images/green16x16.jpg" width="16" height="16" alt="Green Square"> <a href="http://www.wickham43.net/lists.php">Lists</a></td>
- </tr>
- </tbody>
- </table>
- </body>
- </html>
- ';
- // To send HTML mail, the Content-type header must be set
- $headers = 'MIME-Version: 1.0' . "\r\n";
- $headers .= 'Content-type: text/html; charset=utf-8' . "\r\n";
- // Additional headers as http://php.net/manual/en/function.mail.php
- $headers .= 'From: Your Name <mail@your-domain.com>' . "\r\n";
- //ACTIVE mail below to $admin (you) and $email (the other person)
- mail( $admin, "Feedback: $subject", "$name $email", "From: $admin" );
- $send_contact=mail( "$name <$email>", "Feedback: $subject", $message, $headers );
- if($send_contact){
- echo "Thanks," . $name. ", I have sent you an email with the information.";
- }
- else {
- echo "ERROR";
- }
- ?>
In the above form the first mail function is set to send to your email address ($admin) from your email address ($admin) instead of from the viewer's email address ($email). This is because many ISPs or hosting services will assume that an email sent from your server but with a different "From" address is spam and block the email as suspected spam. In these situations it's best to send the email from your own email address to your own email address and put the viewer's email address in the body of the message. It does mean that you will be sending an email to yourself, so it's a good idea to code some text into the subject like "Web form reply" so that you recognise it as a reply to your web form (where I have "Feedback: $subject" in the example above). This email received by you would only contain the name and email address of the other person for your records and will not be html formatted (which would require the $headers variable).
The second mail function sends the html formatted email to the viewer's email address using the name and email address ("$name <$email>") in the "To" part of the email.
After submitting the name and email address the web page shows:- Thanks, [the person's name], I have sent you an email with the information.
Note that the table can process old table styles like cellpadding="2" or inline styles like style="background: #eee;" but external stylesheets cannot be processed. Images should be given absolute urls like http://www.wickham43.net/images/green16x16.jpg and not relative urls like images/green16x16.jpg.
I have disabled the above form but if it was submitted, this would be the body of the email received by the other person. It's a very simple example. If you put all the content inside a table and give it a background image and a solid border you can make it much smarter:-
Send a personal HTML email
2 You can use the form to send your own personal html email by entering the name and email address of the person you want to send the email to in the form; after editing the process-html.php file with your personal message.
Edit the first mail function (to your own $admin email address) to add $message like this:- mail( $admin, "Sent to: $name, $subject", "Copy of email to:- $name, $email $message", $headers ); to give you a copy instead of just the name ($name) and email address ($email) entered into the form as I have coded above. The message will appear to come from you and to you, with the name of the person you sent the email to in the subject and message parts of the email and will be html formatted because of the $headers variable.
The second mail function sends the html formatted email to your contact's email address ($email) and remains the same as in the example above.
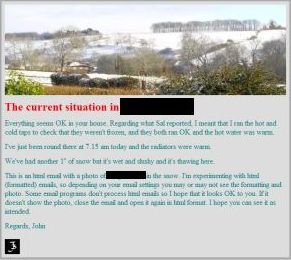
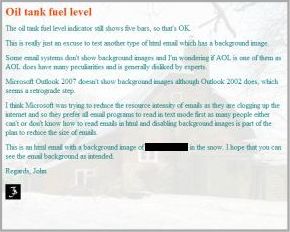
Typical examples of a html emails with a header image or a background-image are shown below.
General advice regarding HTML emails
See Sitepoint and reachcustomeronline.com and MailChimp and css-tricks.com and Emailology for general advice and Campaign Monitor for html email support by various email clients.
Here are some of the coding issues that I have found important:-
- Use tables preferably with old-fashioned styles like bgcolor="#eeeeee" instead of CSS inline styling like style="background: #eeeeee;" if there is a choice, otherwise use inline styles, as some email systems seem to process the old table styles better than inline CSS.
- Don't use an external stylesheet or head section style tags.
- Don't use JavaScript or PHP.
- Use absolute urls like http://www.your-domain.com/images/photo.jpg instead of relative urls like images/photo.jpg for images and include width="600" height="193" alt="Image description".
- I found that if I looked at an html email that had been addressed to a hotmail address using Firefox to view it as webmail the code style="font-family: serif;" was ignored and it showed as a default Arial font style while IE, Outlook, AOL and other smtp email programs showed serif. Using the old format font family="serif" made no difference (font face is deprecated). I made Firefox show serif by coding style="font-family: Times, serif;".
- Don't put styles in the table tag unless they relate only to the table envelope; repeat styles for every <td> tag like
<td style="font-family: Times, serif; font-size: 16px; color: #ff4500; font-weight: bold; border: none;">......</td> - Don't use short-code styles like style="border: 2px solid #ddd333;" but show each separately like border-top: 2px solid #ddd333; border-right: 2px solid #ddd333;" etc., etc.
- If you want to show a background image, note that Outlook 2007/2010 does not show background images although Outlook 2002 does. Other email programs have difficulties with background images unless they are coded in a certain way. Hotmail will not show a background image if it's coded for a whole table which has more than one <td>...</td> tag, so the method to use is to set up an outer table which only has one row and one <td>...</td> tag with <td style="background-repeat: no-repeat; background-color: #ffffff;" background="http://www.your-domain.com/images/photo.jpg" width="600" height="488" valign="top"> for the <td> tag and put the table which has your content in several <tr>...</tr> and <td>...</td> tags inside. The width and height are whatever you want for the email, preferably the width of the background image and the height will increase automatically if it's needed for more content in the nested table, and the background-repeat: no-repeat inline style should stop the image repeating in email systems that process inline styles.
- Most email programs edit your html code, stripping out some items and adding others. If you send an html email to a hotmail address and then forward it back to yourself from Hotmail you can look at the source code to see what Hotmail has edited.
For instance, <td style="margin: 5px; border-bottom: #aaaaaa 5px solid; border-left: #aaaaaa 5px solid; border-top: #aaaaaa 5px solid; border-right: #aaaaaa 5px solid; background-repeat: no-repeat; background-color: #ffffff;" background="http://www.your-domain.com/images/photo.jpg" width="600" height="488" valign="top">
becomes <TD style="BORDER-RIGHT: #aaaaaa 5px solid; BORDER-TOP: #aaaaaa 5px solid; BORDER-LEFT: #aaaaaa 5px solid; BORDER-BOTTOM: #aaaaaa 5px solid; BACKGROUND-REPEAT: no-repeat; BACKGROUND-COLOR: #ffffff" vAlign=top width=600 background=http://www.your-domain.com/images/photo.jpg height=488>.
Note that Hotmail has deleted the margin as it doesn't process margin. Color is often replaced with RGB(170, 170, 170) code.
PHP email form processing generally
The PHP code for processing forms normally requires a hosting service with Apache server to process PHP. A Linux operating system is often recommended for the hosting service in preference to a Windows OS, (it doesn't matter what you have on your computer), but I don't think that is vital as long as the host has Apache and PHP. There are problems using Godaddy as a hosting service and Godaddy have a special form and email recommendation, so the form above may not work on a Godaddy server.
You can put Apache server on your computer for local testing in localhost by installing WampServer or XAMPP which will also give you PHPmyAdmin and MySQL database.
You cannot send an email from localhost using WampServer or XAMPP unless you edit the php.ini file inside one of the WampServer or XAMPP folders. See roshanbh.com or Google for another tutorial. Save a copy of the original file first in case you make a mistake. It's easier and safer to upload your form and test by sending an email to yourself via your hosting service server.
Notes
View/Source or View/Page Source in browser menu to see all html code.
The body of this page has margin: 20px. The examples above are in a containing div with width: 730px; and margin: auto; so that the page centralises at large screen resolutions.
A lot of codes have been put in html tags in my examples rather than in a stylesheet or in a style in the head. I have done this for the convenience of the viewer so that most (but not all) codes are in one place and the stylesheet does not always have to be viewed in addition. When coding your own page you should try to put as much as possible in a stylesheet and link with id or class to the html tag.
Remember that when a Doctype is included above the head before the html tag (as it should be) then the overall width of a div is its defined width plus borders, margins and padding widths.
If there are differences between Firefox and IE6 that cannot be overcome with one code, code first to get a satisfactory solution in Firefox then create an conditional comment which will only apply to IE6:-
for instance, if margin-top: 20px; in Firefox needs to be margin-top: 30px; in IE6 then put the following in the head of the html/xhtml page:-
<!--[if ie 6]>
<style type="text/css"> div { margin-top: 30px; } </style>
<![endif]-->
or if there are many different styles, create a separate stylesheet:-
<!--[if ie 6]>
<link rel="stylesheet" href="ie6.css" type="text/css">
<![endif]-->
IE6 will contain just the amended styles such as div { margin-top: 30px; } and others (no head or body tags or Doctype).
When looking at a page source for this site you may see code like <p>Little Egret</p> instead of <p>Little Egret</p>. The code < is because in that instance the code is to be displayed on the screen as text. If the < symbol was placed in the code a browser would activate the code and it would not display as text. Such code is not normally required when writing html code tags which are to be activated.
© Wickham 2026